Author Archives: imghani

About imghani

Imran Abdul Ghani is working as Software Developer(Senior) with extensive knowledge in Web development technologies especially C#, ASP.NET, MVC, WCF, Web API, ADO.NET Entity Framework, jQuery etc. He has several years of experience in designing/developing enterprise level applications. He is Microsoft Certified Solution Developer for .NET (MCSD.NET) since 2005. You can reach his blogging at www.webdevelopmenthelp.net, www.topwcftutorials.net, and www.sharepointfordummies.net.

How to create a Page Layout in SharePoint?

What is a Page Layout?

A Page Layout in SharePoint allows you to create a template for a page that users apply to their content for a consistent layout of information. Page layouts help dictate the overall look and feel of a Web page.

User can create custom page layout by following ways:

  • Using design manager new SharePoint 2013 feature
  • Using visual studio with help of content type

Note: You can get a good reference of Microsoft SharePoint 2013 Quick Reference Guide here.

Create Page layout using Design Manager

In this SharePoint for dummies article, I will explain how user can create custom page layout with help of design manager for existing content type.

Let’s follow a step by step approach for implementation:

  1. Navigate to Site Settings -> Design ManagerSite Settings in SharePoint 2013
  2. Next in Design Manager select “Edit Page Layouts” option and then “Create a page layout”.SharePoint Design Manager
  3. Enter page layout name and select existing content type.Page Layout in SharePoint 2013
  4. When the Layout is created, it gets available in “Edit Page Layouts” list and the “Master Page gallery” of the site. The Layout Page will be in Drafts mode until user publish it as a major version.Master Page Gallery
  5. For making Changes to the Custom Layout, you need to download the html file (see above – StudentCustompageLayout.html) of your layout page and make necessary changes to it. The modified html file is then saved back to the Master Page gallery where the corresponding .aspx file gets updated automatically.
  6. User can change as per requirement in .html file and updated and saved the Layout page, user need to publish the Layout page as a major version to make it available in Layouts list.Publish a Major Version
  7. Finally, create a new Page with your Custom Layout.
  8. Navigate to Site Content in Site Settings and then open the “Pages” gallery.
  9. Click on “New Document” and provide relevant information and click on create button.Create Document

Finally you have created page based on newly created page layout. It will be much easier for the reader to understand related concept and detailed implementation. You can really find more helpful material if interested to improve your skills by validating in Microsoft MCSD Certification Exams i.e. Microsoft SharePoint Applications development.

More related from Microsoft SharePoint For Dummies:

How to embed a Video in SharePoint?

There are several ways a user can add audio or video clips to a SharePoint page when editing the page in browser. Here we are going to discuss the following ways to embed a video to SharePoint. We will follow a step by step approach to achieve the desired output.

  1. Add the media web part on the page
  2. Embed a video on the page using embed code

What’s Required:

  • Activate SharePoint Server Publishing Infrastructure feature.
  • Silverlight must be installed.

1. Add the media web part on the page:

  • Open SharePoint site and open page where you want to show video.
  • Edit the page using site action option.
  • Click on “Add a web part” option on the page. It will open add web part property in ribbon bar.
  • Select “Media web part” option in Media and Content section.Media Web Part in SharePoint 2013
  • When the Media Web Part appears on the page, click the text that states “Click here to configure”.Configure Video in SharePoint
  • To configure the Media Web Part to display a specific audio or video file, point to “Change Media” option in ribbon bar, and then select one of the following:
    • From Computer
    • From SharePoint list
    • Embed
    • From Address
  • Click “From Computer” option and select video file and click on ok button.
  • It will play video.Play Video in SharePoint

Note: You can get detailed information about Microsoft Certification Exams related to SharePoint 2013 here.

2. Embed a video on the page using embed code:

If user want to use embed code from a third-party video-sharing website like YouTube’s video to add a video to a page, you can do so by adding the embed code to the Content Editor Web Part.

  • First you have to add Content Editor Web Part on the page.
  • On the Format Text tab of the Editing Tools ribbon, in the Markup group, click HTML, and then click Edit HTML Source option.Content Editor Web Part
  • Then add following code in “HTML Source” editor window and click on OK button.

    <iframe width=”560″ height=”315″ src=”//www.youtube.com/embed/nJjXnTcPg1hc” frameborder=”0″ allowfullscreen>

    HTML Source

  • It will play your video in the SharePoint site.Playing through Content Editor

These are the 2 simple ways to embed video on a SharePoint page. Hopefully, now the user can easily achieve the desired goal of embedding video by following the above step by step approach.

More related from Microsoft SharePoint For Dummies:

How to aggregate various Calendars from different data sources into a single SharePoint Calendar?

Introduction

Before we go any further to the details of this article, ask yourself how many different accounts (actually Calendars) do you use in your day to day life including both personal as well as professional activities? Research has shown that on an average, a person working with a small to medium size team (2 – 10 person) ends up at least 5 places to looks for the various events happening which might impact his or her work. And the strange part is that many of those events are announced on various different platforms including plain emails, meeting requests, team calendars etc. SharePoint provides a neat way to handle all these events in one place i.e. SharePoint Calendar. In this article, we will learn more about SharePoint Calendars, Overlays and usage of Exchange as well as Google Calendars within SharePoint.

SharePoint Calendars

SharePoint Calendar is a great feature for teams and/or individuals who use SharePoint as a collaboration platform. It provides these teams a great tool to have one single place to check and mark the events which are important for the people involved in this group. It could be used for a recurring Team Meeting event, an announcement of a public holiday or even as a reminder to team members for a deadline.

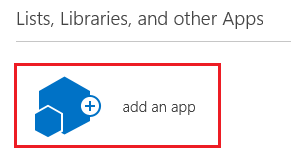
Adding a Calendar in SharePoint is as simple as adding a new App as shown in the figure below:SharePoint Calendar

Once created, the calendar provides you with a default monthly view to see all the events which have been registered. For example, the calendar below shows an event called “Monday Rocks” (Really, shouldn’t Friday rocks? ☺. This is just one example, where your team can make use built-in and out-of-the-box SharePoint calendar feature to have a transparent collaboration.Aggregating Calendar

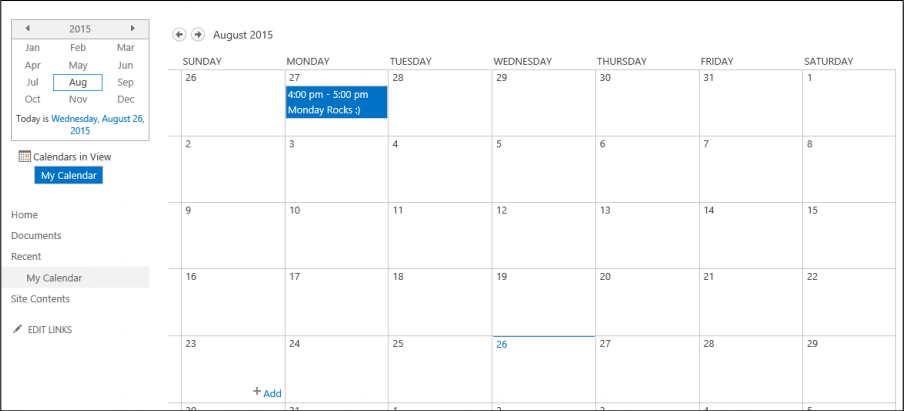
Adding an event to a SharePoint calendar is not any different from adding a new list item. Btw, did you know that everything in SharePoint is essentially a List and just displayed with different views?Add New Item to Calendar

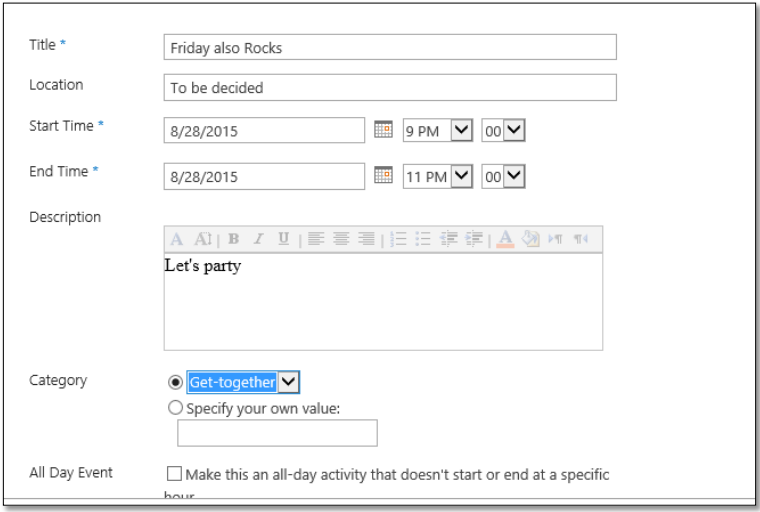
For those of you, who are interested in checking the different views (including list view) of calendar can use the “Current View” as “All Events”.SharePoint 2013 Calendar View

Calendar Overlay

In a section above we created the event explicitly within our SharePoint Calendar. However, another nice feature SharePoint provides you is to create an overlay of other calendars from another site within the same site collection, Exchange Calendar etc.

Let’s see how to use Calendar Overlay feature to connect to an Existing Exchange Calendar.
To start with, use the Calendar Overlay option from the Calendar tab.Calendar Overlay

The next dialog asks you to select the “Type of Calendar” and the choices are SharePoint and Exchange. For this example, let’s select Exchange which asks you to provide the Outlook Web Access (OWA) URL as well Exchange Web Service (EWS) URL. Refer to the Outlook Web Access for more details here and follow here to know how to determine EWS.Aggregated Calendar Overlay

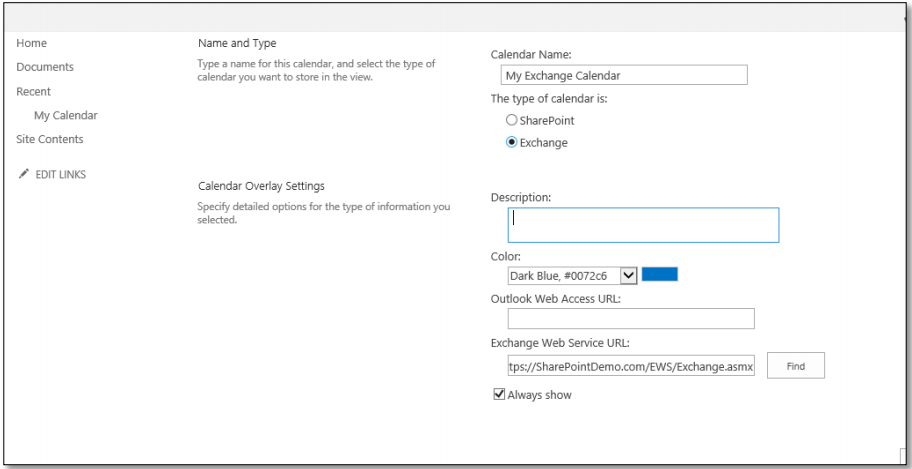
And there you see the Exchange calendar synced to your SharePoint calendar. You can see the Green “My Exchange Calendar” Overlay which shows a meeting on Monday.
It’s important to keep it mind that to make the Exchange synchronization work with SharePoint, you need to have the proper user profiles set-up within SharePoint with the corresponding mapping of email addresses which are present in Exchange.Calendar Overlay with Exchange

Calendars Overlay with Google Calendar

So far we saw how to make use of the standard, out-of-the box features of Calendar to sync from a SharePoint List or that even from an Exchange Calendar. But hey, we were talking about connectivity between Microsoft eco-system which is usually the case present.

What about if you want to include the events from your Google Calendar or for the sake of discussion even from a Facebook Event list or any sort of custom list you have.

Let’s start with a bad news that SharePoint does not support any custom integration to custom calendars.
However, the good news is that there are multiple ways to achieve that.

Approach 1:

One way to synchronize your Google events to SharePoint is actually follow a middle path and without any custom code written.

The trick (or call it a hack) is to sync your Google Calendar with your Outlook/Exchange Calendar. Once this is done, you can always follow the approach to add Exchange Overlay to a SharePoint Calendar as demonstrated before in the article.

To learn more about Google sync to your Outlook Calendar, refer to this link.

Approach 2:

I would not call this approach the better solution but of course it’s one of the approaches which would be preferred by developer community against the Information Worker community. Typical, custom vs. out-of-the-box feature mind-set☺.

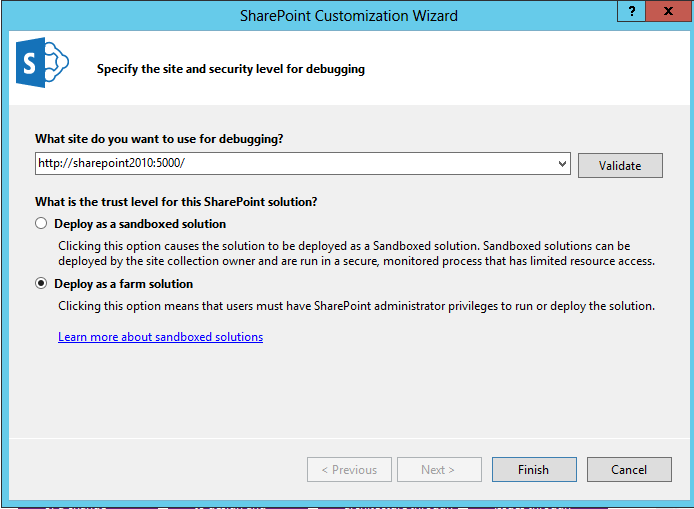
Starting SharePoint 2013, the preferred way of writing any custom code in SharePoint is not to have a Full Trust solution but make use CSOM (Client-Side Object Model). Also remember, there is no Full Trust solution in Office 365. You can make use of the SharePoint CSOM and integrate the Google Calendar by following the steps as given below. In the scope of the article, we will not write code but only the structural way to perform this action which essentially can be written in any programming language:

  • Read the Google Calendar Programmatically.
  • Create list item based on previous step in SharePoint Calendar List (remember, SharePoint Calendar is nothing but list).
  • Schedule the script/program based on previous steps in Task Scheduler.

Approach 3:

You can use a third-party solution. This approach has many advantages: you save your time and get many features of professionally designed software. As for SharePoint calendar, a third-party web part is capable of aggregating various calendars from many data sources, not only Exchange and Google Calendar, but many more. For example, Virto SharePoint Calendar allows users to use as data source any SharePoint list, SQL table, XML file, SharePoint list web service, Sales force calendar and SharePoint lists from other farm.
The one and only disadvantage of this approach is the cost. Choosing software purchasing, make sure it has all necessary features and it worth its price. So you shall decide if you will spend money or spend your time and customize your SharePoint Calendar by yourself.

Hopefully, the article gives an in-depth understanding about SharePoint Calendars, Calendar Overlays and multiple approaches on how to aggregate various calendars from different data sources into one SharePoint Calendar.

More related from Microsoft SharePoint For Dummies:

3 Simple Steps to Create a Visual Web Part in SharePoint

What is a Web Part?

SharePoint Web Part is basically a reusable component designed for a particular task and can be easily added to a
SharePoint page for customization/personalization. But for me as a developer, its a user control that is deployed at Site Collection level so that all sites under the site collection can reuse it.

Types of a SharePoint Web Part?

There are two types of Web Parts in SharePoint:

  • Standard/Traditional Web Part
  • Visual Web Part

The primary difference is that visual web part has the flexibility to drag and drop items on our canvas giving us a designer experience. While standard web part doesn’t have that flexibility and we have to manually do the coding stuff. There are other important differences between the two types of web parts but we are not going into that much details here. For detailed difference, you can visit Microsoft Online MSDN here.

Purpose:

In this article, we will learn how to create Custom Visual Web Part using Visual Studio? and further how to add data from Visual Web Part to a SharePoint list?

Pre-Requisites?

  • SharePoint 2013
  • Visual Studio 2012

Step 1: Creating a Custom List in SharePoint Site

  1. Create custom list “Employee” in your SharePoint site.
  2. Add following columns in newly created list.
    • Name
    • Phone No
    • Address

We already have discussed and implemented two simple ways to Create a Custom List in SharePoint 2013 in previous article on Code Project here.

Step 2: Creating a Visual Web Part

  1. Create a new Empty SharePoint 2013 Project.SharePoint Customization Wizard
  2. Provide SharePoint site URL, where you want to deploy your solution and select “Deploy as a farm solution” option.
  3. Now, Right Click the Project, then Select “Add” and click the “New Item” link in the context menu.Add New Item to SharePoint 2013
  4. This invoke the “Add New Item” window. In the “Visual C# Section” Templates, select “Visual Web Part”.
  5. Provide a name for the Visual Web Part and click “Add” button to add it to the SharePoint Project.Employee Custom Web Part
  6. This will add a new Site Collection scoped Feature to the SharePoint project along with the newly added Visual Web Part. This WebPart will be automatically added to the feature. This you can find out by double clicking the feature file.Web Part Solution
    Web Part Solution
  7. Double Click the .ascx file created in Step 5. Add controls that are required for Visual Web Part by expanding the Toolbox pane available in the left hand side of Visual Studio.Visual Web Part
  8. Double click the Save button, it will open .cs file. Add following code in button click event.Save Visual Web Part
  9. Now, right click the solution and click on Deploy option.Deploy Custom Web Part
  10. This process will deploy solution on the SharePoint site and add your custom web part in web part gallery.

We have successfully created and deployed a simple Visual Web Part using SharePoint 2013.  But more useful Web Parts can be developed to simplify specific organizational needs. There are many built-in Web Parts available in SharePoint like Chart Web Part, Content Query Web Part etc.

Also, we can have a Custom Web Part that can read data from several data sources and present in more helpful way with multiple views. SharePoint Calendar Web Part is an excellent example that shows all events from different data sources including Exchange, SharePoint List, Google, SalesForce, SQL Table or XML and further present in multiple views. Let’s follow the step 3 to add our Web Part to a Page.

Step 3: Add Web Part to the Page

  1. To add the newly created webpart which we have developed, Open the page and click on the edit page option. From the insert tab, select webpart icon. Choose the custom webpart which we have deployed from custom category and click on Add button.Add Web Part
  2. It will add custom web part on the SharePoint site.Employee Info as Web Part
  3. Now fill-up all information and click on save button. This information will be save in SharePoint ‘Employee’ list.

Hopefully, we understand now that how simple is to create a Visual Web Part in SharePoint 2013 and use it in our pages.

How to Create a Task List in SharePoint 2013?

Task List in SharePoint 2013

Tasks lists in SharePoint are used for capturing actions, to-dos, and deadlines. Whenever multiple people are working together to deliver on time a joint project or initiative you need some way of effectively communicating what everyone is supposed to do. You also track what everyone has (or has not) done in order to manage the project properly.

Benefits of using Task List in SharePoint 2013

  • Faster and easier user interface.
  • More flexibility with tasks and sub tasks.
  • Improved project insight with colors and a graphical timeline.
  • Enhanced accessibility with a mobile view of the task list.

In this article we will follow the below steps to learn about the following features:

  • Create Task List.
  • Creating New Task in SharePoint 2013.
  • Delete a Task
  • SharePoint Timeline

It’s really easy for developers having background in ASP.NET Technology to grasp these SharePoint related concepts easily.

Creating a Task List in SharePoint 2013

  1. Login with SharePoint site.
  2. Navigate to Site and Click on “Settings” option and then click on “site contents” option.Task List in SharePoint 2013
  3. Then click on “add an app” option.SharePoint List & Libraries
  4. Then click on “Tasks” option from your app.SharePoint Tasks
  5. Give the Task Name and click on create button.Adding Tasks
  6. It will create new task list, where you can manage your task relevant to project.Project Management Tasks

Creating New Tasks in SharePoint 2013

  1. Open the create task list and click on “New Task” icon.New Task in SharePoint 2013
  2. Add all relevant information and it will create one task in task library.SharePoint 2013 Task Details
  3. These task also assigned to relevant user, so whenever assigned user login with site, he can find this task and start working on it. He/She can also add task progress so all are aware of task’s progress.

Deleting a Task in SharePoint 2013

  1. Login as admin user and open task list.
  2. Select relevant task and open it. After that click on Delete button from ribbon task. This task will be deleted from task list.Deleting Task in SharePoint 2013

SharePoint Timeline

Users have the ability to display or remove tasks or sub tasks from the timeline.

How to Add a Task in Timeline? – When you create a task click on “…” to open task preview window. Here you can select “Add to Timeline” to add the task to the above timeline. You can remove it from same way with “Remove from timeline”.Adding Task to Timeline in SharePoint 2013

Hopefully, this SharePoint for dummies article enables SharePoint 2013 users to understand how to create Task List, add tasks to Task List, Remove the Tasks from Task List (if required) and  add/removes tasks from their timeline.

More related from Microsoft SharePoint For Dummies:

3 steps to create a Workflow using SharePoint Designer

Microsoft SharePoint Designer Workflow

Workflows are now important part of any project. We can develop a Microsoft SharePoint Workflow using the available templates, SharePoint designer and Visual Studio. In this article will mainly focus on workflow creation using Microsoft SharePoint Designer.

Advantages:

  • Basic workflow can be implemented by trained users.
  • Relatively quick to implement for low complexity workflow.

Dis-Advantages:

  • No built-in source control.
  • Difficult to deploy to other environments.
  • Sequential workflow only.

Workflow created in three ways using Microsoft SharePoint designer:

  1. List workflow
  2. Reusable workflow
  3. Site workflow

Note: In this SharePoint for dummies tutorial you will learn simple basic workflow, where current date set in list item through SharePoint designer. I have used SharePoint Designer 2010 for implementation purpose but process will remain same if you use SharePoint Designer 2013.

Step 1: Create a list for SharePoint workflow

  1. Login with SharePoint site.
  2. Navigate to Site and Click on “Settings” option and then click on “site contents” option.SharePoint Site contents
  3. Then click on “add an app” option.add an app
  4. Select “Custom list” option from the “your app” page. It will be popup for open create custom list.Custom List in SharePoint
  5. Give the proper name and click on Create button.Adding Custom List
  6. These steps will create custom list in site, now you can add multiple columns with different data type in this list.New SharePoint List
  7. Now open create custom list and go through list setting and click on “Create column” option and create multiple column with different data type as per need.Create Column in SharePoint
  8. I have added Current Date and Description filed in this list.

Note: We have created a simple List here but another SharePoint for Dummies article on Multiple Ways to Create a Custom List in Microsoft SharePoint 2013 is already covered here.

Step 2: Create workflow in SharePoint designer

  1. Open your SharePoint site in SharePoint designer.
  2. Click on “List and library” option in Navigation section.SharePoint Designer Lists and Libraries
  3. Select “TodaysDate” List and double click on it, it will open list’s properties.Custom List Properties
  4. Now, Click on “List Workflow” in ribbon bar and fill-up workflow information.List Workflows in Microsoft SharePoint
  5. It will open new window for workflow.New Window for Workflow
  6. Click on “Local Variables” in ribbon bar.Local Variables in ribbon bar
  7. It will open local variable window, where you can local add variable.Workflow Local Variables
  8. Add current date as local variable.Current date as Local Variables
  9. Now, come on workflow part, write set and just click on search option and select “set Workflow variable”.Set Workflow Variable
  10. Now, click on “workflow variable” and select “CurrentDate” option from dropdown.Workflow Variable OptionsWorkflow Variable Select Options
  11. Now click on value field and set current date option.Workflow Option Value
  12. Now select under line option and select.Workflow Underline Options
  13. Select “set Field in current Item”.Set Field in Current Item
  14. Now, click on Field item and select “CurrentDate”.Current Date Field Item
  15. Now, click on Value filed and click on selected item.it will open one pop-up. You have to select Data source as “Workflow variable and parameters” and Field from source as “current date”.Look up for Field Item
  16. Click on workflow settings in ribbon bar.SharePoint Workflow Settings
  17. Select “Start workflow automatically when an item is created” option. This option our workflow will be automatically start on while any item is adding.Start Workflow Automatically
  18. Now click on Publish button in the ribbon bar. So our workflow will be publish and its ready to use.

Step 3: Microsoft SharePoint Workflow Check

  1. Open SharePoint site and open TodaysDate custom list.
  2. Click on new item. It will open popup for entering value. You have to just add Title field’s value and click on save button.Running New Item
    then….Add Item in SharePoint Workflow
  3. Now, our workflow will start and it will set current date field’s value and workflow will completed.Running Workflow

More related from Microsoft SharePoint For Dummies:

Creating Discussion Board in Microsoft SharePoint 2013

Discussion Board in Microsoft SharePoint 2013

Discussion Board is used for communication among team members. The discussion board shows the most recent discussion first on top, as well as the number of replies for each discussion. User can quickly see which discussions have the most recent activity and which ones are the most popular discussion. Members can also customize their own views of the discussion board. In this SharePoint Tutorial for beginners, we will follow a step by step approach to create a discussion board in Microsoft SharePoint 2013 and further see how to create a thread under it.

Key Features of a Discussion Board:

  • Communication between team members.
  • Shown recent discussion of team members.
  • Admin user can set number or limit of discussions and shown on top.
  • Easily customization.

Steps to Create a Discussion Board in Microsoft SharePoint 2013:

  1. Login with SharePoint site.
  2. Navigate to Site and Click on “Settings” option and then click on “site contents” option.SharePoint Site Contents
  3. Then click on “add an app” option.SharePoint List & Libraries
  4. Then click on “Discussion Board” option from your app.SharePoint Discussion Board
  5. This option will be available in publishing site, but it’s not available in team site template. So click on site section option.Site Section in SharePoint
  6. Then click on “Manage Site features” option.Manage Site Features
  7. Then activate the “Team Collaboration Lists” option.Team Collaboration List
  8. That’s it. Now “Discussion Board” option available to user.
  9. Now click on “Discussion Board” option, as per step 4. It will open one popup box.Adding Discussion Board
  10. Give proper name of discussion board list and it will create discussion list in your site.Available Discssion ListsNew Discussion List
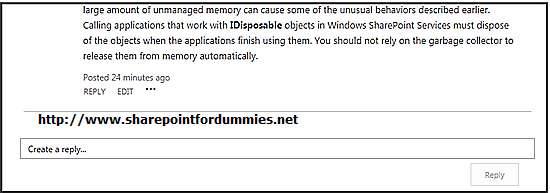
It will show most recent discussion first and you can customize as per need.

Note: We have already discussed the same step by step approach to create a Custom List in Microsoft SharePoint 2013 using SharePoint Designer that will also be beneficial.

Steps to Create a Thread on newly created Discussion Board

  1. Click on new discussion option.New Discussion
  2. It will start new thread of particular discussion.Add New Discussion
  3. Now login user can participate in this thread and give their own view.Thread View in Discussion
  4. User can reply immediately after the post by clicking on the textbox at the end of the page, then clicking the Reply button.Reply Discussion Board

Discussion Views in Share Point

Each discussion can be seen with many different Out-of-Box Views.

The views available are:

  • Flat
  • Management
  • Threaded

Available Discussion Board Views

Other Microsoft SharePoint For Dummies and related Articles:

Simple Steps to Create Content Type in SharePoint 2013

What is a Content Type?

A Simple way of explaining what is SharePoint Content Type is by imagining us grouping Columns used in your list or library together, which we plan to reuse often.
For example, if I know I have to often use “First Name, Last Name, Phone No, Birthdate” etc. columns together when working with task, then I will group together into an “Employee” Content Type.SharePoint Content Type

Where Content Type is used?

  • SharePoint List and Library
  • Page layout
  • Workflow
  • Event Receiver

Key Features of Content Type:

  • Content types is a term used for describing a collection of metadata
  • SharePoint content types support user interface customization
  • SharePoint content types can have specific user interface elements attached
  • SharePoint content types support behavior through workflows and event receivers
  • SharePoint content types support inheritance of properties, appearance, and behavior

Step by Step Creating a Content Type

  1.  Create a content type is a very simple. For this fist you have to create Site Column.
  2. Click on Site Setting in site action menu. Then click on Site columns.Site Columns in SharePoint 2013
  3. Then click on “Create” button on the top bar.Create Site Columns
  4. Add Site column name with appropriate data type.Site Column in SP 2013
  5. I have used following data type for site columns.
    Site Column Name Data Type
    First Name Single Name
    Last Name Single Name
    Phone No Number
    Birth Date Date and Time
  6. In this way, you can created four site columns.Site Columns
  7. Now, we have create content type with help of these columns.
  8. Click on “Site Content Type” in site setting option. Then you have to click on “Create” button on the next screen.Site Column Types
  9. Then give the content type name and select appropriate parent content type. Here I have selected document parent content type. These steps will create content type.New Site Content Type
  10. Then, add following columns in create content type.Site Content Type

How to Use a Content Type?

  1. You can associate content type with following features:
    • SharePoint List and Library
    • Page layout
    • Workflow
    • Event receiver
  2. We are going to associate created content type with document library.
  3. For this, first we have to enable content type option in document library.
  4. So, Open document library, then click on list setting and click on advanced setting option.Advanced Settings
  5. Then click on “Add from exiting site content types” in list setting option.Existing Site Content
  6. Select created “Employee” content type and click on add button.Existing Content Type
  7. Now, employee content type is available in document menu.Document Library
  8. While you upload any document in this document library with help of this employee content type and you have to enter all metadata information.SharePoint Web Parts

In this we you can create content type as per your requirement and used in SharePoint site.

Other SharePoint and related Articles:

2 Simple Ways to Create Custom List in SharePoint 2013

What is a Custom List?

A Custom List is a collection of different type of columns and information pieces which are collaborated together and is developed with some unique set of properties which provides user to access form features.

Key Features of a Custom List

  • Ease to use
  • You can Share information and data with other users.
  • You can set rich standard interface
  • Can easily add binary data
  • Accommodates workflows
  • List items can be linked/synced with outlook to specific users and become a task
  • Relative links can be linked/synced to other lists in SharePoint without to refresh formulas.
  • Lists can contain links (URLs) to other SharePoint pages that contain information, documents or emails related to the project.
  • Everyone on the team can access, change and update this list whenever and from wherever, even from mobile also.
  • No compatibility issues.

Approaches to Create Custom List

Custom list can be created with following approaches:

  1. Using SharePoint OOTB UI feature
  2. Using SharePoint Designer

1. Create Custom List using SharePoint OOTB UI feature:

Follow the steps:

  1. Login with SharePoint site.
  2. Navigate to Site and Click on “Settings” option and then click on “site contents” option.SharePoint 2013 Site Settings
  3. Then click on “add an app” option.Add an app - SharePoint 2013
  4. Select “Custom list” option from the “your app” page. It will be popup for open create custom list.Create Custom List in SharePoint 2013
  5. Give the proper name as “EmployeeList” and click on Create button.Adding Custom List in SharePoint 2013
  6. These steps will create custom list in SharePoint site, now you can add multiple columns with different data type in this list.Newly Created Custom List
  7. Now open create custom list and go through list setting and click on “Create column” option and create multiple column with different data type as per need.Create Column - Custom List

2. Create Custom List using SharePoint Designer:

  1. Open SharePoint Designer and move to top navigate and select “SharePoint List” option and then select the Custom List.Custom List using SharePoint Designer
  2. Moving forward add a decent name and description for the listSharePoint Designer Custom List
  3. Finally click OK once done.

Hopefully this step by step approach will help SharePoint developer to understand in details the possible ways to create a Custom List in SharePoint 2013 using OOTB UI features and SharePoint Designer.

Other SharePoint and related Articles:

Difference between Apps and Farm Solutions in SharePoint 2013

SharePoint 2013 has brought exciting new features which extend SharePoint Apps as well as Farm solutions. These two are used in different ways, hence the need to know which one to choose depending on the scenario at your disposal. Here is a comparison between the app and farm solutions in SharePoint 2013.

SharePoint 2013 Apps

SharePoint 2013 Farm Solutions

A SharePoint App is a mere user friendly stand-alone computer program that can solve a specific end user problem. A farm solution is a piece of functionality that extends the abilities of a SharePoint website. The farm administrator is responsible for installing such functionality pieces.
SharePoint 2013 Apps code can run in different places. Important thing to remember about SharePoint App is that it always operate by the context of the web browser that they are running on or the hosted platform instead of running in the context of SharePoint server. These are installed by a farm administrators, to the solution store belonging to a farm. Their point of operation is the SharePoint server.
SharePoint hosted Apps cause SharePoint to create a new website referred to as web app. You can store pages, libraries and lists using the web app. Deployment of a farm solution causes changes to one or more web applications. It can be used in any site collection of the web based applications where it has been deployed
Event receivers, custom field types, custom web parts, application pages can be created as SharePoint Apps. Almost all components can be deployed as farm solutions.
Authentication mechanisms depend on where the code of the application is running. Inside SharePoint, authentication is already taken care of. You simply have to use JavaScript and HTML. Inside the cloud, there are two choices for you. You can use the client side code or the server while using cross domain libraries and OAuth respectively. The components in the solution often run in full trust.
Resource allocation can be monitored and allocated accordingly by tenants and administrators. There are no resource usage and allocation that are placed on Farm solutions.

Hopefully, the reader will be clear about the differences between Apps and Farm Solution in SharePoint 2013 with respect to Operations, Security and resource allocation.

Other SharePoint and related Articles: